There are many benefits to roasting your own beans. Not only does it guarantee the freshest cup, but it expands your knowledge of the art behind brewing.
You might think it’s complicated to learn how to roast green coffee beans at home, but we’re here to tell you that there are many ways to do it that require little to no extra materials or costs. We give you the complete rundown in our detailed guide!
What Are Green Coffee Beans?
The starting point of every coffee roasting journey is a bag (or container) of green coffee beans. This is what a raw coffee bean looks like before it undergoes the roasting process and turns a rich chocolate brown with that delectable aroma we love.
If you’re getting cold feet about roasting your coffee, you can brew the green beans as is. Ask any health nut, and they’ve probably heard of the rising green coffee trend.
While the brewing process is quite different and tastes more like mild tea, this up-and-coming brew has many health benefits.
But you’re here because you feel confident that you can roast your green beans, so before we cover the best way to roast coffee beans at home, let’s talk about the alchemy behind the brew.
The Science Behind Roasted Coffee Beans
Have you ever heard of the Maillard reaction? It’s what’s responsible for the chemical transformation that occurs when green coffee beans are roasted.
This process begins when the raw beans reach a temperature of 150°C/302°F. As the beans continuously absorb heat, a reaction occurs between the amino acids and carbohydrates that make up the beans, changing the entire profile.
The longer the Maillard reaction takes place (the longer you roast), the more the color, nutrition, and flavors change. That’s why we have various roasts, which we will discuss later in the article.
Roasters can experiment with the length and intensity of the Maillard reaction to create a roast with a new taste and feel.
A Brief Overview of Coffee Roasting at Home
It can seem intimidating to learn how to roast green coffee beans at home. But it’s actually a fairly simple process that makes a significant difference in the aromas and flavors of your morning brew.
You’ll be happy to know that it doesn’t take much to accomplish either- you just need time and a reliable heating source to initiate the Maillard reaction.
There are 4 methods to roast your beans.
- Popcorn popper
- Home coffee roaster
- Oven
- Pan and grill
If you’re in a rush or have limited supplies, then the oven, pan, or grill might be the best option for you. These methods require tools that the majority of folks have at home already.
Now don’t expect the most pristine roast, as it’s difficult to get the timing and temperature down pat. Nevertheless, you’ll still get to savor the bittersweetness of freshly roasted beans, and that enhances the coffee experience in itself.
For a more streamlined roast, a popcorn popper produces a quality roast and is easy to use, but go for a coffee roaster for a perfect roast with little effort. It’s made for the job after all, but it is expensive.
While you can find popcorn poppers for $20, a nice coffee roaster can cost anywhere between $150 to $500.
At this point, you may be eyeing your microwave and wondering if it’s Maillard-worthy. Look, if you are passionate about coffee, then please don’t put your green beans in that box.
The result is a poor roast with inconsistencies that will make you spit out your coffee as soon as you sip it. If you’re roasting beans at home, go ahead and try one of the four methods we cover instead.
Know Your Coffee Roast Grades
We’ve all spent our fair share of time standing in the coffee aisle at the grocery store, trying to choose from the overwhelming selection of coffee roasts. Now is your chance to learn what they actually mean!
Once you get the hang of roasting your coffee beans, you’ll be able to experiment between grades to find what you like the most. These are the most common ones you’ll see at cafes and in stores.
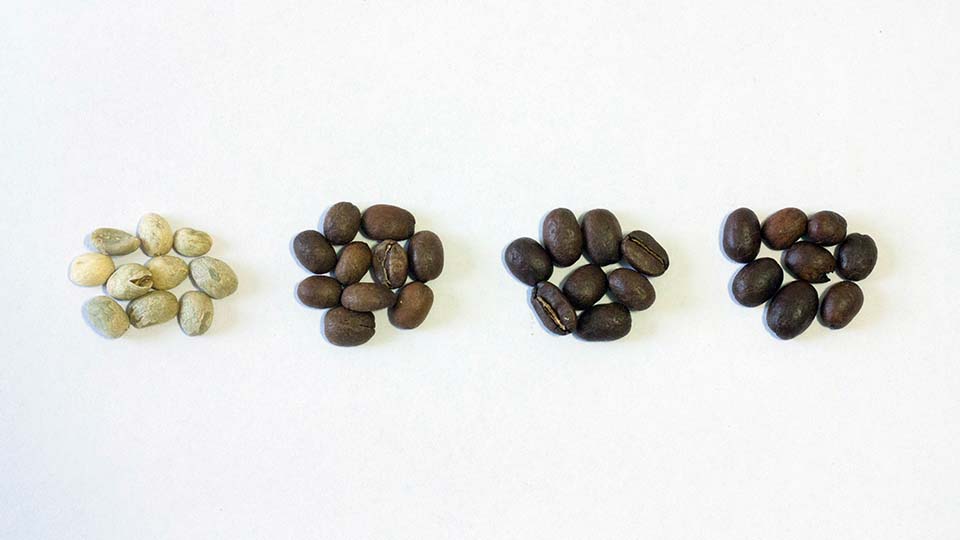
Light Roast/ First Crack
At this stage, the beans will look dry and are pale in color with no oily surface. They are just beginning to crack and expand from the heat, so the taste is milder for a light-bodied coffee.
The flavors are more acidic, and there should be no hint of roast. You can expect fruity or floral notes since the first crack retains most of the raw bean aromas and flavors. Light roast is recommended for pour-over coffee. This roast is achieved at 350°F.
Medium Roast
You still get a dry, oil-free bean, but with a brownish hue and sweeter notes brought out by a longer roast time that decreases the acidity and exposes the aromatic flavors.
Full-bodied, yet condensed, many consider the medium roast the perfect balance of acidity, aromas, and flavors. This roast grade is achieved at 428°F.
Medium-Dark Roast
Extensive roasting results in beans with a deep chocolate color with a little bit of oil on the exterior.
All of the acidity is cooked out, leaving the aromas to rise freely to the surface. The result is a robust, bittersweet flavor. This roast is achieved at 437°Fat the sound of the second crack.
Dark Roast/ Second Crack
You’ll know this roast when you see (and taste) it- black, oily beans with a distinctly bitter flavor.
This grade has no trace of acidity, but you may taste the thick, spicy notes that cultivate a rich coffee experience. This roast is achieved at 464°F at the end of the second crack or even exceeding it.
The Step-By-Step Guide on How to Roast Coffee Beans
Now that we’ve gotten the formalities out of the way let’s roast some green beans! Got your barista hat on? We break down our favorite 4 methods for roasting coffee beans at home like a pro.
Roasting Coffee Beans at Home Using a Coffee Roaster Machine
The coffee roaster is dedicated to roasting coffee beans without any hassle, making it the most reliable method of the four. It also ensures coffee consistency. Once you find your perfect roast, there’s no need to tweak the settings any longer.
It’s an expensive buy, though, so it’s best to practice with the oven or a pan before deciding whether or not roasting is an art you want to dedicate yourself to for the long term. If you are passionate about coffee, then a roasting machine may be a worthwhile investment.
Supplies:
- Green coffee beans
- Coffee roasting machine
- Oven mitts
- Metal Colander
Directions:
- Consult the user manual of your roaster and follow the directions carefully to ensure the best roast.
- Make sure you have proper ventilation because most roasters will produce a large amount of smoke.
- The process is simple: Turn the machine on, add the beans, and adjust the settings according to the directions.
- While most machines are automatic, you’ll want to watch the beans closely and pay attention to the first and second cracks. Remember, once the first crack has occurred this means you’ve reached a light roast, while the second crack signifies a medium roast.
- Once you’ve reached your desired roast (around 8-12 minutes total), cool the beans by transferring them to a colander. Let the beans sit for 12 hours to vent CO2.
Pro Tip: When purchasing a home roaster, consider the amount of coffee you consume on a weekly basis. Air roasters are the perfect size for small batches, while drum roasters have large chambers to hold more beans at a time.
How to Roast Coffee Beans at Home Using a Popcorn Popper
It is possible to achieve a perfect roast using this method, but you need to take care and prioritize safety.
Popcorn poppers aren’t meant to roast coffee beans, so if you continue to use this tool, it may decrease the lifespan of your appliance or even cause it to break.
Supplies:
- Green coffee beans
- Popcorn machine with side vented heat
- Wooden spoon
- Metal colander
- Oven mitts
- Air-tight container
Directions:
- As always, start by ensuring there’s plenty of ventilation- things are about to get smoky.
- Go ahead and preheat your popcorn popper according to the manufacturer’s directions.
- Measure out a ½ cup of raw coffee beans and pour them into the popper (or you can use the same amount recommended for popcorn kernels). Once initiated, the beans should agitate. If not, there may be too many beans.
- Use a wooden spoon to push the beans around and encourage agitation. Once they are moving on their own, place the lid firmly on the machine.
- Watch the beans and use your spoon to shift them around if they slow down.
- The chaff will come out of the popper’s spout. Use a bowl to collect the chaff and avoid a messy clean-up.
- After 3-5 minutes you should hear the first crack. If you are aiming for a light roast, stop the machine. If you want a deeper roast, keep it going.
- You should hear the second crack around 6-8 minutes. This is a medium roast. If you want a dark roast, wait 30-60 seconds longer. Be careful, because if you go even a minute over then you risk burning the beans.
- Wear your oven mitts and transfer the beans into a colander to cool them. Let the beans sit for 12 hours to vent CO2.
Pro Tip: Got a popcorn popper that heats from the bottom? Avoid using this type of machine because it may give you a poor, uneven roast, and it can ignite the chaff, causing a fire. Side vented heat is best!
Roasting Coffee Beans in the Oven
Learning how to roast coffee beans in the oven is similar to the pan and grill method, mainly because it’s budget-friendly and perfect when you’re in a bind and need your coffee.
Get ready for tons of smoke, though, and you’ll need to be patient- this method takes some time.
Supplies:
- Green coffee beans
- Perforated tray or a regular tray if you don’t have one
- Oven
- Metal colander
- Oven mitts
- Air-tight container
Directions:
- Start by preheating the oven to 500°F. Keep in mind that you may need to experiment with the temperature from this point to achieve your desired roast. This is the challenge with using an oven, but once you get it down then it’s a solid way to roast.
- Ventilation. Ventilation. Ventilation.
- Prep your beans by spreading them evenly over the baking tray. Make sure they are not overlapping, you only want a single layer. You can always slip a sheet of baking paper on top of the tray to help contain the beans.
- Place the baking tray on the middle shelf for the most consistent temperature.
- You should hear the first crack between 5-7 minutes, signaling a light roast.
- For a medium roast, listen for the second crack. If you want a darker roast, wait no more than 60 seconds after the second crack.
- Wear your mitts and transfer the beans to the metal colander to cool, stirring them a bit with a spoon. Let them vent CO2 for 12 hours.
Pro Tip: While the beans are roasting, open the oven door every couple of minutes to stir or “agitate” the beans. This ensures a consistent extraction of flavors and aromas.
How to Roast Coffee Beans in a Pan/Grill
This is a fast and budget-friendly way to get your beans roasted without purchasing any extra supplies. Everyone has a pan lying around, right?
The only downside is that it can be difficult to get the temperature right (like the oven method), which may turn your house into a smoky mess.
Supplies:
- Green coffee beans
- Cast iron pan or an uncoated pan
- Hot plate/Grill (gas is recommended)
- Metal colander
- Oven mitts
- Wooden spoon
- Air-tight container
Directions:
- To reduce smoke impact, grill outside if you can. If you have to roast indoors, you know the drill- ventilation!
- Set your grill or hot plate to medium heat and wait until it reaches 450°F to roast. Remember that it will take practice to find the right temperature, which is one of the inconveniences of using this method.
- Spread the beans in a single layer on the pan.
- Stir the beans continuously while they roast, never letting them rest to ensure even heating.
- The first crack should sound around 4-5 minutes for a light roast.
- The second crack should happen around 6-7 minutes for a medium roast. For a dark roast, wait no more than 30 seconds after the second crack.
- Don your mitts and transfer the beans into the colander. Stir the beans a bit, then let them cool. Leave the beans exposed for 12 hours to vent CO2.
Pro Tip: Coated or non-stick pans aren’t suitable for roasting beans because they result in weak, inconsistent coffee flavors.
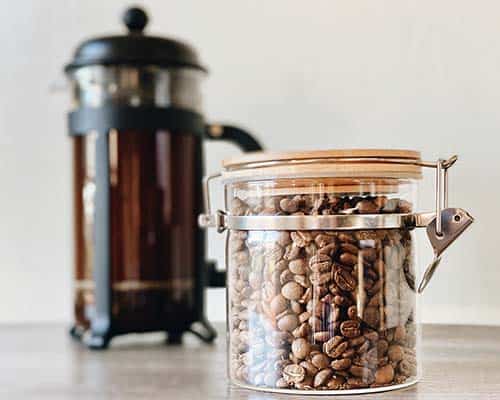
Store Your Freshly Roasted Coffee Beans
You did it! You learned how to roast coffee at home. Now what?
After you roast your own coffee beans, air, moisture, heat, and light can negatively affect the composition and flavor. Storing them correctly is essential to preserve the freshness as much as possible.
Keep oxygen away by protecting your coffee beans in an airtight container or vacuum-sealed bag. Store them in a dark, cool place so that sunlight can’t reach them, as this can negatively affect the flavor.
You can also freeze your beans, taking out as much as you need for a week’s worth of brewing. Just be sure that the container or bag is truly airtight to prevent freezer burn.
A Note About Venting Your Freshly Roasted Coffee Beans
You need to vent your beans for around 12 hours before storing them to release enough CO2. This is important for the following reasons:
- The beans will spoil if oxidation occurs.
- Too much CO2 may result in an overabundance of crema.
- Too much CO2 may negatively affect the taste of your coffee.
- Sealing the beans in a container before they’ve had a chance to de-gas properly can lead to CO2 pressurization, popping the lid off of your container.
How to Roast Green Coffee Beans Conclusion
Learning how to roast green coffee beans is a fast and fairly easy process that you can do at home. There is a small learning curve as you tinker with various temperatures and methods to figure out how you prefer your roast.
Overall, the best way to roast coffee beans is with a home coffee roaster, but this is an expensive option that’s ideal if you plan on roasting your beans for the long term. If not, the oven, grill, or popcorn popper can be just as good to get a fresh, delectable roast on the fly.
References & Resources:
- How to Roast Your Own Coffee in 6 Simple Steps, thrillist.
- A Basic Guide to Roasting Coffee in a Frying Pan, Mr Green Beans.
- Home Roasting Coffee in an Oven, I Need Coffee.
- Beginner’s Guide to Coffee Beans and Their Processing Stages, Spoon.
- How to Roast Coffee Beans, wikiHow