Perhaps I’m a little old fashioned… but when it comes to hunting, I like to use as much of the animal as possible.
That means taking extra steps to make sure that: I’ve kept as much of the meat as possible to fill my freezer and belly; I’ve salvaged as much fat off the animal as I can to make lard for cooking and for making salves and ointments; and I’ve cooked down the bones for broth for soups and roasts.
This also means that I like to save the hides and going through the work of thoroughly drying and tanning them. This gives me leather and fur that I can then use to make clothing, bags, belts, blankets, or as wall hangings to showcase the effort I’ve put in as a hunter and pay tribute to the animal. Plus, it gives me a little extra cash in my pocket should I choose to sell the tanned hide, leather, or goods that I’ve made.
Tanning hides is a relatively simple process, but it takes some effort and is messy. If you’re the kind of person who’s easily grossed out by gooey textures and pungent smells, then tanning hides really isn’t for you. Then again, given the nature of hunting and all that it demands, I’d feel safe to say that a person with such a delicate nature isn’t really meant for hunting in the first place.
These tips and instructions will be for tanning a hide with the hair intact, not for producing smooth hairless leather. The process is different, as with tanning a hide there are extra steps that need to be taken to ensure the hair doesn’t fall out. As such, when tanning leather, there are extra steps that are taken to remove the hair, hair follicles, and membrane layers.
Tanning Hides with Hair Intact
Skinning the Animal
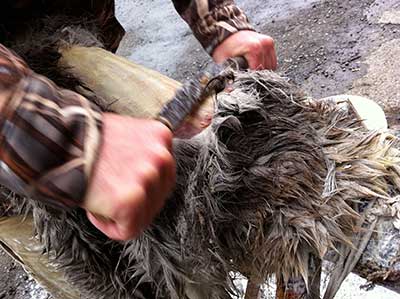
This will be much the same as you normally would. The only difference is that you’ll want to take extra care to ensure your cuts are smooth and straight and that you don’t punch any holes in the hide. (Don’t worry about bullet holes, as you can repair those later or work around them, depending on how you’ll be using the hide.)
Once the hide is removed, you’ll need to clean it, taking care to remove as much remaining tissue and fat from the hide as possible. This can be done with a fleshing tool, a smoothed and burnished rib bone, or a curved stick that you’ve sanded and smoothed.
Salting the Hide
Unless you have all of the materials necessary to tan your hide immediately, you’ll need to salt the hide. If so, you can skip this step as salting the hide is a preservation method to stave off decomposition and buy you extra time until you can tan the hide.
Salting needs to be done as soon as possible once the flesh has been removed from the hide. Waiting can lead to decomposition which will cause the hair to fall out in the tanning process. This isn’t so much of a big deal, as you can just remove all the hair and have smooth leather to work with, but it serves as an important lesson on what not to do for next time.
How much Salt?
You don’t need to worry about stretching the hide or tacking it down. Just lay the hide so that it is flat, hair side down, and spread a good layer of salt onto the hide. I’ve read that non-iodized salt is best, but personal experience with iodized and non-iodized salt have not shown a difference in quality with the finished product.
Do not skimp on the salt. The salt will work to pull the moisture from the skin, effectively drying it out. You’ll want to ensure that there is an adequate amount of airflow, low moisture in the air, and that the hide is in a place where it’s not at risk of being chewed or gnawed on by predators, mice, or less than well-behaved pets.
How long is the salting process?
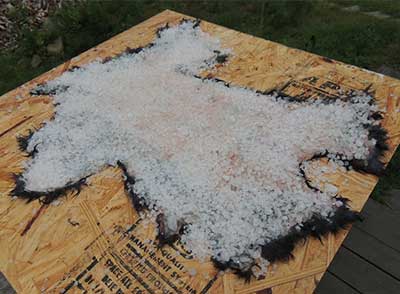
This process takes anywhere from a few days to a week or so. You may need to add more salt to some locations. The process will go faster if the hide is laying on a surface that won’t encourage the retention of moisture beneath the hide and within the hair. If so, you may wish to reposition the hide. Allow the hide to lay flat with adequate salt until the skin is hard and firm.
Once in this state, the hide can remain preserved this way for quite some time. This is convenient if you didn’t have the time or materials on hand right away to tan the hide.
I’ve preserved hides in this fashion for a year with no negative impact on the hide, even though I had to re-salt the hides thanks to a flooded basement.
Gathering your Materials
While it is true that you can use items such as brains and acorns to tan hide, these methods are better suited to tanning leather as the hair nearly always falls off. Instead, the method detailed below is modern, using materials that you can easily get from your grocery store, an auto supply store, and that you likely already have laying around at home. This exact recipe is courtesy of Mother Earth News and has worked effectively for me whether I was tanning deer hides, cottontails, jackrabbits, or my son’s first squirrel. This recipe will be enough to do four deer hides.
HERE’S WHAT YOU’LL NEED:
You’ll also need something to apply the oil with, such as an old (but clean) paintbrush, a handful of nails, and something to stretch the hide on as it dries. You can tack it to the side of your shed, recycle a pallet, or construct simple stretcher with a few 2×4’s.
Getting Started
Despite all the work you went through to thoroughly dry the hide, you’ll now need to soak it in clean water prior to tanning. You need the hide to be soft and pliable, otherwise, it will split and tear if you tried to tan it while dried out and crunchy.
If you’re using a fresh hide, you can skip this step and get to work mixing the tanning solution, as the hide will already be soft and flexible.
The tanning solution
While the hide is soaking, you can start mixing the tanning solution. You’ll want to soak the bran flakes in approximately half the amount of water you’ll be using. Place the bran flakes into your 5 gallon pale and add about 2-3 gallons of boiling hot water. Let this mess sit for at least an hour. Then strain out the mushy flakes, discarding them and saving the brown water.
Place the salt into one of your garbage cans and add the remaining amount of water. Mix thoroughly until the salt is dissolved, then add the bran water. This mixture should be pretty cool by now, but you’ll want it no more than lukewarm before the next step.
The Battery Acid
Safety first, people… the next step is to add the battery acid. Take care to keep yourself safe and to make sure that small children and pets are out of the area. Safety glasses, old clothes, and sturdy gloves are heavily recommended throughout this process but especially at this step. Remember, being careless and purposely making stupid mistakes doesn’t make you tough or “more” of a man – it just makes you stupid and means you have the scars to prove it.
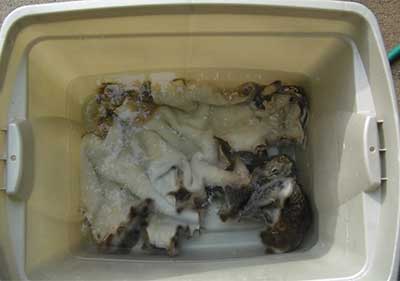
Pour the battery acid into the water carefully avoiding splashing. Mix it slowly, again, to prevent splashing.
If you have a fresh hide, you can add it to the solution now, using your mixing stick to push them down and into the solution. If your hide has been dried, you can now remove it from the water. If there is a dry membrane layer on the surface of the skin, now is the time to remove it. Then place the hide into the solution.
Once the hair soaks up the solution and the hide stays submerged you’ll be able to let the hide sit. Let the hide soak for about 45 minutes, no more than an hour. You’ll want to stir it every few minutes to make sure that every part of the hide is submerged and soaking up the tanning solution.
Rinsing the Hide
While the hide soaks, fill up your other garbage can with warm water. You can add a box or two of baking soda to the rinse water to help neutralize the battery acid on the hide, but this isn’t necessary. If you have sensitive skin and will be making clothing of the hide, you may want to use the baking soda, otherwise, skip it.
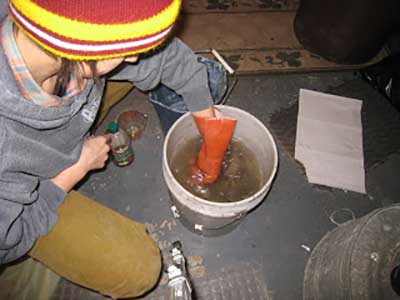
Place the hide into the rinse water, stirring it continuously for several minutes to remove any salt from the hide as well as to wash off some of the battery acid. (The skin will absorb some of the acid, that’s part of the tanning process, but excess acid in the hair and on the surface of the skin can be an irritant.)
Thewater will turn really dirty –that’s a good sign. Change out the rinse water and rinse again to be sure you’ve got as much of the salt off of the hide as possible.
Once rinsed, remove the hide and hang it to dry. This can be over a wooden saw horse, deck rail, or the back of an old chair. Let the hide hang a bit so that most of the water runs off of it.
When it’s mostly dry, yet still damp to the touch, it’s time to apply the Neatsfoot oil. This oil works to keep the skin soft and supple while also helping to further preserve it. It really is a staple to have on hand if you’ve any interest in taxidermy or simple preservation methods for animal remains. The oil will absorb quickly, leaving a light sheen.
Drying and Stretching
Now’s the time to stretch the hide so it can dry. If you don’t stretch it, the hide can actually shrink considerably while drying.
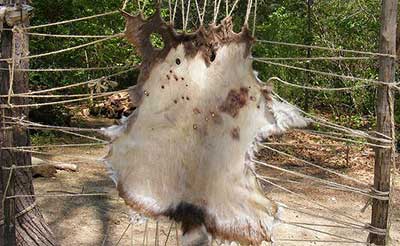
Lay the hide flat across your stretcher and tack it in place. Pull gently, keeping the skin taut and smooth, and continue to tack in place. Do not pull hard as you could tear the hide at any of the nails. Remember, you’re not trying to make the hide larger, rather you’re trying to keep it from getting smaller.
Once stretched and tacked, the hide should sit in a cool, shady place with good airflow for a few days. This step shouldn’t take any longer than it did to dry the hide with salt. You’ll want to check the hide daily. When you feel that the center is dry, you can take the hide down.
Softening the Hide
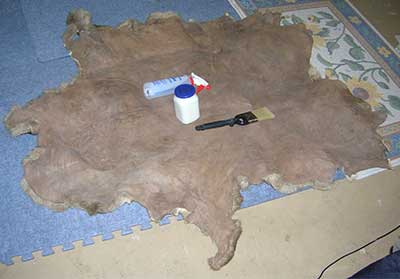
This is possibly the most important step – and the one that most people overlook. If you don’t soften the hide, it will be perfectly preserved and tanned, but it will have a tough and cardboard like feeling rather than the soft, butter smooth feel you want.
There are a few options available to you. One is to work the hide back and forth across a taut wire (the arm motion will be similar to that old Nordic track commercial, with your arms pumping back and forth in front of you as you work the folded hide back and forth across the wire.) The repeated action serves to soften the hide though it will take some time and strength on your part.
Another method that is easier on your arms is to gently work the skin with a wire bristle. You don’t want to scrape the hide so much as to gently work it across its entirety. Take care not to stay in one place too long, as you want to evenly work the skin.
Disposing of your Tanning Solution
This is where that baking soda comes into play. You’ll want to pour in the baking soda and then get out of the area. Be sure to do this in a well-ventilated area. This will neutralize the acid. From there, depending upon ph requirements in your area, this liquid may be able to be safely disposed of down the drain. Check with local ordinances before proceeding.
Tanning Hides Conclusion
By following the steps outlined above, you’ll learn a new skill that allows you to preserve even more of the animals you hunt. From there, you can use these tanned hides to make yourself a hunting bag, warm winter mittens, a hat, a blanket for your bed, or a soft rug for your floor.