Winter hunting can wreak havoc on your skin. It can make your cheeks red and raw from “windburn” and your lips cracked from the dry wind and cold temperatures.
Why not just go to Walgreens?
While it’s all well and good for some people to use those fancy lotions and lip balms made with exotic ingredients, I know you’re a different sort of person. You’re the kind of guy that when you see a problem, you handle it yourself. For that do-it-yourself spirit and willingness to tackle problems, here’s a simple project you can undertake to combat that windburn skin and chapped lips – using simple ingredients that have been used by ordinary people for hundreds of years for one reason: they work.
Here’s how to make a healing DIY salve that you can use on your hands, face, and lips to combat the winter damage. The one your skin will suffer after a day out in the woods hunting or racing through the snow on your snow machine.
Ingredients
You’ll need a few ingredients but nothing too difficult to come by. Most of them you can get from your local grocery store, though you may have to venture into your local natural food store to pick up a few. Some of the herbs you’ll need very likely grow in your backyard, so with a bit of forethought (and taking the time to dry them properly in a cool, dark place) you can cross those items off the list.
Gather your Materials
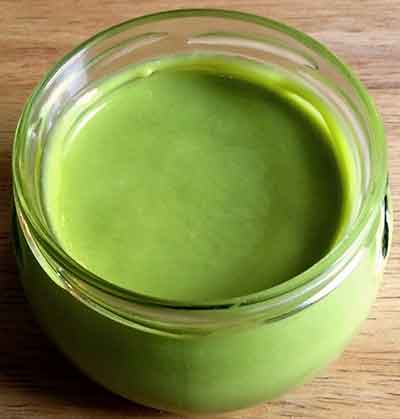
This recipe will make about one cup of finished salve, which should be enough to get you through the worst of winter. You can always make up another batch.
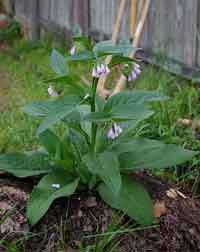
Both Comfrey and Plantain grow wild throughout North America and Europe. Comfrey is easily mistaken for pre-blooming Foxglove (which is toxic) so be sure to consult a field guide if you plan on gathering your own herbs.
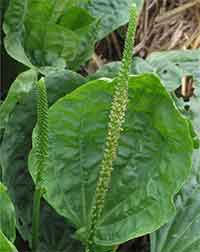

Plantain very likely is growing around your yard and driveway. It’s a pretty distinctive plant, with paddle-shaped leaves and dark green color. It doesn’t have any look-a-likes, so you can gather it safely. You’ll want just the leaves, not the seed stalks. You’ll want 1/3 dried which means you’ll need anywhere from two to twelve leaves –depending on the size of the plant (Plantain will grow quite large if undisturbed, with leaves the size of your face and a good foot or so long. Most plants grow much smaller, though, due to high foot traffic, so you’ll more likely find plants with leaves that are four to eight inches long.)
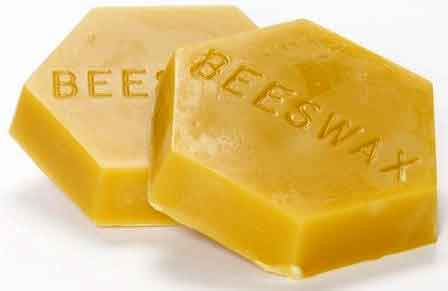
Beeswax can be gotten from nearly every natural foods store, as can the herbs you’ll need. It’s usually sold in small bricks of as little as a few ounces to a pound. It keeps forever so don’t worry about purchasing more than you need for this recipe, as you’ll just have extra for future projects.
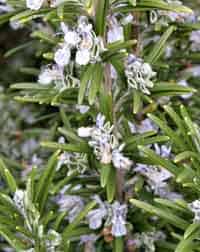
This combination of ingredients is great for healing skin. Olive Oil has been used for thousands of years as a moisturizer as it penetrates deep into the skin. Rosemary contains important properties that aid with cell regeneration, speeding up healing. Comfrey has similar properties and is very soothing to the skin. Plantain is a great standby for all skin complaints, from cuts and scrapes to insect bites to rashes.
Getting Started
We recommend reading through these directions before making your salve. The process isn’t complicated, but it pays to have a good idea of what you’re doing before you get going.
1
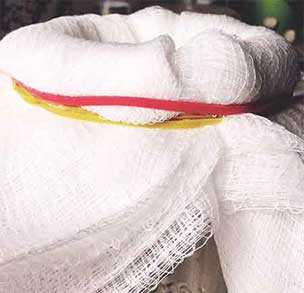
Start by fixing the cheesecloth over the top of the jar. You’ll want to fold the cheesecloth, so it’s at least eight layers thick. This ensures that when you strain the oil through the cheesecloth, as much of the herbs are caught by the cloth and don’t pass through. Place the cheesecloth over the mouth of the jar and press the center so it hangs down and into your jar slightly. Use one or two rubber bands to hold it in place.
Make sure you have all your materials at hand. It helps to have the herbs pre-measured in bowls. You can place the Comfrey and Plantain together in the same bowl, but keep the Rosemary separate.
Grate the beeswax beforehand. This allows it to melt faster. You can use a cheese grater or a butter knife to shave off strips from your wax block. Remember, you only need an ounce (about one tablespoon) of shaved beeswax, which won’t take much grating.
2
Steeping the Herbs
Pour the Olive Oil into the pot and heat it gently on low to medium low heat. You don’t want the oil to burn or to boil; rather you just need it warm enough to extract the healing properties naturally found in the herbs. Add the Rosemary, using the rubber spatula to mix it thoroughly.

Once you can start to smell the Rosemary, add the Comfrey and Plantain. Stir the oil so that everything is blended well. The oil will begin to take on a darker hue. Stir occasionally, being sure to scrape the bottom of the pot to keep the oil from scorching. Once you can smell the Comfrey (it has a vegetal smell) remove the pot from the heat.
Cover the pot with a lid and let it sit until the oil is still warm, but not hot.
3
Straining the Herbs
Once the oil has cooled, carefully pour the oil into your jar. The cheesecloth will catch the herbs and let the oil run through. Use your rubber spatula to scrape out every last bit of herbs from the pot and into the cheesecloth.
Carefully remove the rubber band without allowing the cheesecloth or herbs to fall into the jar. Gather the corners of the cheesecloth toward the center and up, then gently squeeze it to get more of the oil out of the herbs and into the jar. The herbs can now be discarded into the trash, your compost pile, or out in the woods.
4
Turning Oil into Ointment
Now pour the oil back into your pot, making sure to get as much out of the jar as possible. Warm the oil again on low to medium low heat. Slowly add the grated beeswax, mixing it as you add it. Continue to stir until all of the beeswax is melted and mixed thoroughly.
Remove from heat and pour the oil and beeswax mix into your jar. Allow it to sit until cool before putting the lid on. The mixture will thicken as it cools, leaving you with a salve that will slowly melt when you scoop some out. This salve is safe to use for even sensitive skin and is even edible –though I wouldn’t imagine it would taste the best.
5
Storing your Salve
Your newly made salve will last for several months as is. You don’t need to worry about refrigerating it, but you should keep it out of direct sunlight and away from heat as these will impact its shelf life. If it should get too soft and melt, you can still use it. This usually happens when the salve gets cold (say from leaving it in your truck while out hunting) and then being warmed back up (like from being in your pocket or coming back inside the house.) But it is still perfectly good and usable, it’s just not as pretty.
DIY Salve Conclusion
This salve recipe uses ingredients and techniques that have been in use for generations. It’s a no-nonsense recipe with straightforward and effective ingredients that have helped countless people to take care of their own minor health needs. This same process can be used to make salves for other purposes, such as for rashes, sore muscles, and even making flavored cooking oils and beard oil.